API-Authentication

🔐 17. API Authentication: Proving You Are Who You Say You Are
The Nightclub Scenario: You want to enter an exclusive club. How do they know you're allowed in?
Three Common Methods:
🎫 1. Basic Authentication: The Simple ID Check
Nightclub analogy: "Show me your driver's license every time you want to enter"
How it works:
Step 1: Client sends username + password Username: "john" Password: "secret123"
Step 2: Combine them: "john:secret123"
Step 3: Encode in Base64: "am9objpzZWNyZXQxMjM="
Step 4: Send with EVERY request: GET /api/posts Authorization: Basic am9objpzZWNyZXQxMjM=
Visual representation:

Pros:
✅ Simple to implement
✅ Widely supported
Cons:
❌ Must send credentials with EVERY request
❌ No way to "log out"
❌ If someone intercepts credentials, they have full access
❌ MUST use HTTPS (otherwise passwords visible!)
Real-world use: Rarely used today except for very simple internal tools.
Mental model: Like showing your ID to security every single time you walk through a door - even if they just saw you 5 seconds ago!
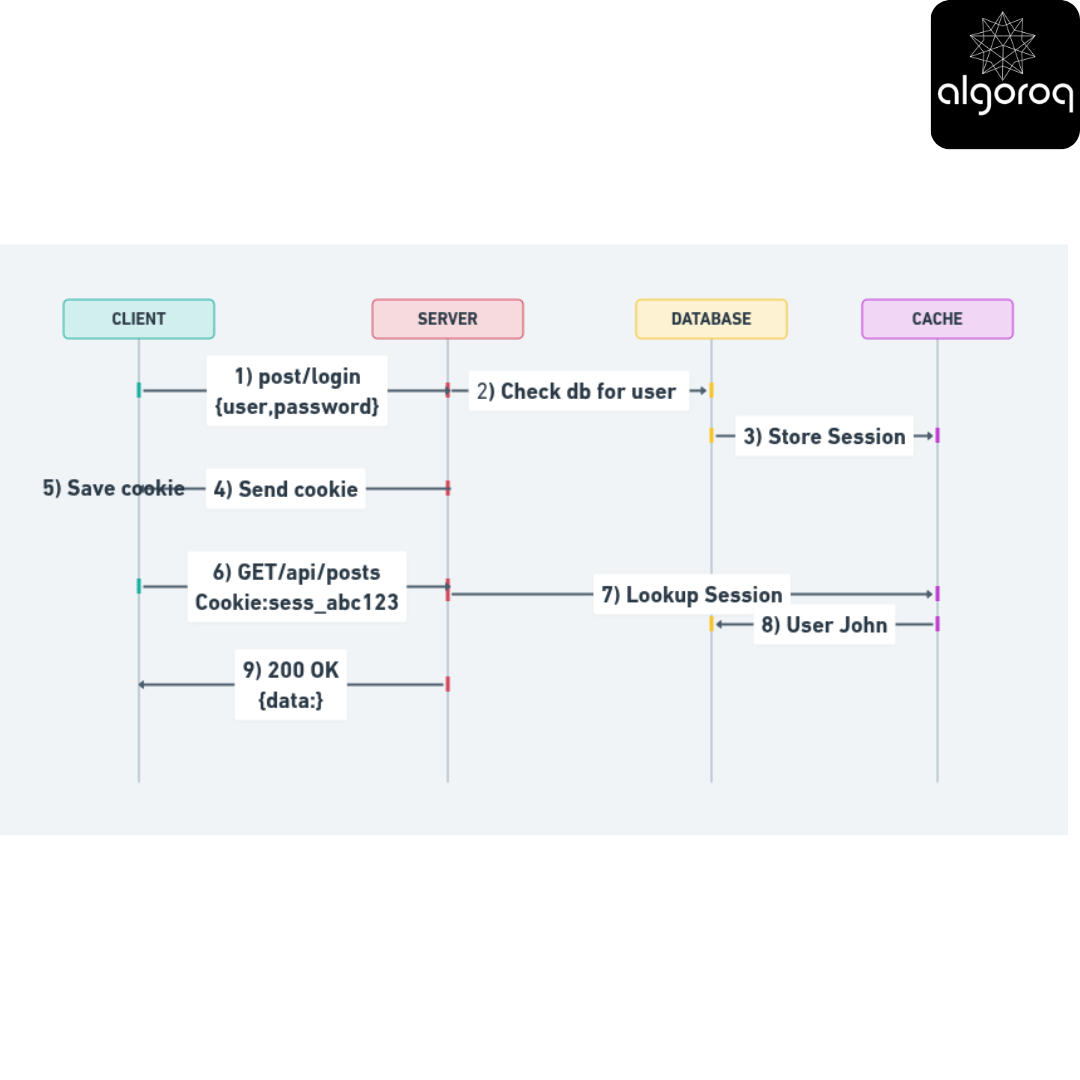
🎟️ 2. Session-Based Authentication: The Wristband System
Nightclub analogy: "Here's a wristband - show this instead of your ID each time"
How it works:
Step 1: Login POST /login Body: { "username": "john", "password": "secret123" }
Server verifies and creates session Session ID: "sess_abc123xyz" Stores in database: { sess_abc123xyz: { user_id: 42 } }
Step 2: Server sends back session cookie 200 OK Set-Cookie: session_id=sess_abc123xyz; HttpOnly; Secure
Step 3: Browser automatically sends cookie with future requests GET /api/posts Cookie: session_id=sess_abc123xyz
Server looks up session in database Finds user_id: 42 Returns: 200 OK with data
Step 4: Logout POST /logout Server deletes session from database
Visual representation:
Pros:
✅ Credentials sent only once
✅ Can easily invalidate sessions (logout works!)
✅ Server has full control
Cons:
❌ Server must store session data (memory/database)
❌ Doesn't scale well across multiple servers
❌ Vulnerable to CSRF attacks (need protection)
Real-world use: Traditional web applications, many banking websites.
Mental model: Like a gym membership - you verify your identity once, get a card, then just swipe the card each visit. The gym can deactivate your card anytime.
🎫 3. Token-Based Authentication: The VIP Pass
Nightclub analogy: "Here's a self-contained VIP pass with your info embedded in it"
How it works (JWT - JSON Web Token):
Step 1: Login
Step 2: Server creates JWT token
Header:
Payload:
Server signs it with secret key
Result: "eyJhbGc.eyJ1c2VyX.SflKxwRJ"
Step 3: Client stores token (localStorage/memory)
Body:
Step 4: Client sends token with each request
Authorization: Bearer eyJhbGc.eyJ1c2VyX.SflKxwRJ
JWT Structure:
eyJhbGciOiJIUzI1NiIsInR5cCI6IkpXVCJ9 ← Header (algorithm) . eyJ1c2VyX2lkIjo0MiwidXNlcm5hbWUiOiJqb2huIn0 ← Payload (data) . SflKxwRJSMeKKF2QT4fwpMeJf36POk6yJV_adQssw5c ← Signature (verification)
Visual representation:

Pros:
✅ Stateless - no server storage needed!
✅ Scales horizontally (works across many servers)
✅ Can include custom data in payload
✅ Works great for mobile apps and SPAs
✅ Can set expiration times
Cons: ❌ Can't easily invalidate before expiration
❌ Token size larger than session ID
❌ Need to protect from XSS attacks
Real-world use: Modern SPAs, mobile apps, microservices, most modern APIs.
Mental model: Like a driver's license - all your info is embedded IN the card itself. Anyone with the right tools can verify it's real without calling a central database.
🎯 Authentication Comparison Chart
| Feature | Basic Auth | Session Auth | Token Auth |
|---|---|---|---|
| Sends credentials | Every request | Only at login | Only at login |
| Server storage | None | Yes (sessions) | None |
| Scalability | ⭐⭐⭐ | ⭐ | ⭐⭐⭐ |
| Security | ⭐ (if HTTPS: ⭐⭐) | ⭐⭐⭐ | ⭐⭐⭐ |
| Mobile-friendly | ❌ | ❌ | ✅ |
| Logout capability | ❌ | ✅ Easy | ⚠️ Complex |
| Modern usage | Rare | Common | Very Common |
Request/Response Lifecycle: The Complete Journey
The Restaurant Order: Step by Step
Let's trace a complete API call from start to finish!
Scenario: You want to create a new blog post.
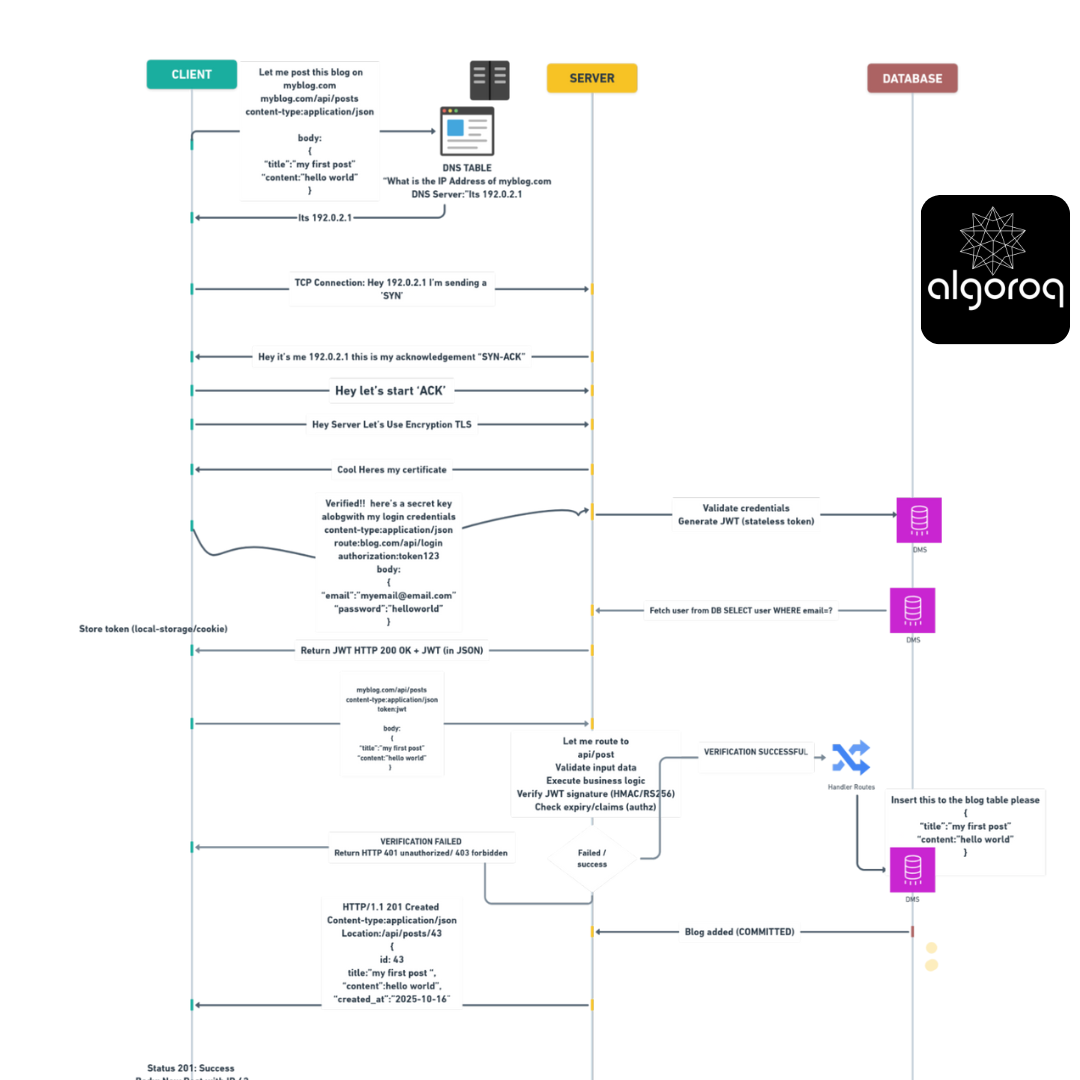
Total time: Usually 50-500 milliseconds!
🎮 Interactive Challenge: Design Your API
Scenario: You're building a social media API. Design the endpoints!
Requirements:
- Users should view their feed
- Users should post updates
- Users should like posts
- Users should delete their own posts
- Users should view someone else's profile
Think about:
- What are the HTTP methods?
- What are the URLs?
- What is the authentication procedure?
- What status codes for success/failure?
Suggested Solution:
-
View Feed GET /api/feed Auth: Bearer token Success: 200 OK Error: 401 Unauthorized
-
Create Post POST /api/posts Auth: Bearer token Body: { "content": "Hello world" } Success: 201 Created Error: 400 Bad Request, 401 Unauthorized
-
Like a Post POST /api/posts/42/likes Auth: Bearer token Success: 201 Created Error: 404 Not Found, 401 Unauthorized
-
Delete Own Post DELETE /api/posts/42 Auth: Bearer token Success: 204 No Content Error: 403 Forbidden (not your post), 404 Not Found
-
View Profile GET /api/users/john Auth: Bearer token (optional for public profiles) Success: 200 OK Error: 404 Not Found
💡 Common API Design Pitfalls (And How to Avoid Them)
❌ Pitfall 1: Using GET to Modify Data
Bad:
Good:
Why it's wrong: GET should be safe and idempotent. Imagine bookmarking that URL!
❌ Pitfall 2: Returning 200 for Errors
Bad:
Good:
Why it's wrong: Status codes exist for a reason! HTTP has a rich vocabulary.
❌ Pitfall 3: Inconsistent Naming
Bad:
Why it's wrong: Consistency helps developers predict your API.
❌ Pitfall 4: Not Using HTTPS
Bad:
Good:
Why it's wrong: You're sending data in plain text! Always use HTTPS.
❌ Pitfall 5: Returning Too Much Data
Bad:
Why it's wrong: Expose only what's needed. Privacy and performance matter!
🎯 Quick Self-Test
Without scrolling back, can you answer:
- What's the difference between PUT and PATCH?
- Name the status code for "resource created successfully"
- Which authentication method doesn't require server storage?
- What does the 'S' in HTTPS stand for?
- If you get a 403 error, what should you do?
Answers:
- PUT replaces entire resource, PATCH updates specific fields
- 201 Created
- Token-based (JWT)
- Secure
- Nothing - you're authenticated but not authorized. Contact admin.
🚀 Your Next Steps
You're now equipped to:
- Design RESTful APIs
- Choose appropriate HTTP methods
- Interpret status codes
- Implement authentication
Continue learning:
- API Documentation: Swagger/OpenAPI specifications
- Advanced Auth: OAuth 2.0, API Keys, JWTs in depth
- Rate Limiting: Protecting your API from abuse
- API Versioning: /v1/ vs /v2/ strategies
- GraphQL: An alternative to REST
- WebSockets: Real-time bidirectional communication
- CORS: Cross-Origin Resource Sharing
- API Testing: Postman, cURL, automated tests
Practice by:
- Building your own REST API
- Exploring public APIs (GitHub, Twitter, weather services)
- Reading API documentation from major companies
- Contributing to open-source API projects
Remember: The best way to learn APIs is to build them! Start with a simple CRUD (Create, Read, Update, Delete) API and expand from there.
🎓 Final Mastery Check
You've truly mastered REST APIs if you can:
- Explain the request/response lifecycle to a friend
- Debug API errors using status codes
- Design secure authentication flows
- Choose the right HTTP method for any operation
- Understand why REST is called "RESTful"
Congratulations! You now speak the language of modern web applications. APIs power everything from mobile apps to smart home devices - and you now understand how they work!
The internet is essentially millions of APIs talking to each other. You've just learned their language. 🌐
Now that you understand the fundamentals, let's dive into some crucial concepts that you'll encounter in real-world API development.
Authentication Methods Comparison
| Method | Credentials sent | Server state | Scalability | Logout | Best for |
|---|---|---|---|---|---|
| Basic Auth | Every request | None | High | Not possible | Simple internal tools |
| Session-Based | Once (login) | Session store | Low (shared state) | Easy (delete session) | Traditional web apps |
| Token (JWT) | Once (login) | None (stateless) | High | Hard (token still valid until expiry) | APIs, mobile apps, SPAs |
| OAuth 2.0 | Delegated | Authorization server | High | Revoke token | Third-party integrations |
| API Key | Every request | None | High | Revoke key | Server-to-server, public APIs |
Key Takeaways
- API keys identify the calling application — simple but not suitable for user authentication, easily leaked in client-side code
- JWT (JSON Web Tokens) are self-contained, stateless tokens — the server can verify them without a database lookup
- OAuth 2.0 enables third-party access without sharing credentials — the standard for "Sign in with Google/GitHub" flows
- Always transmit credentials over HTTPS — API keys and tokens in plaintext HTTP can be intercepted by anyone on the network
- Use short-lived tokens with refresh tokens for security — limits damage if a token is compromised